Where Do Screenshots Go on Mac? How to Change the Location?
You probably agree that taking screenshots on Mac is just a piece of cake. Press a few keys, and that’s it! However, you may ask “Where do screenshots go on Mac?”. After taking the screenshots, it’s quite confusing for beginners to find the screenshots.

Stop digging into different file folders and read this post instead, for this post features 3 ways to answer your question: “Where do screenshots go on Mac?”
So, without further ado, explore them now!
Where Do Screenshots Go on Mac [Taken by All Shortcuts]
“Where do screenshots save on Mac?” Well, the screenshots you’ve taken are automatically saved on your Desktop by default. These screenshots will be labeled like this: “Screen Shot” with the [date] and [time] it was taken with an image format [.png] on end. Whatever way you take a screenshot on Mac, they will go to the same place (Desktop).
Now, if you are not fully aware of how to take a screenshot on Mac, you can start your journey of familiarizing yourself with each of them using the table below!
| Action | Shortcut |
|---|---|
| Capture Entire Screen | Shift-Command-3 |
| Capture Portion of the Screen | Shift-Command-4, move the crosshair pointer, press and hold the trackpad button, drag to the area, and release the trackpad button. |
| Capture a Window or the Menu Bar | Shift-Command-4, then press the Space bar. |
| Capture a Menu and Menu Items | Open the menu, press Shift-Command-4, then drag the pointer to the menu items. |
| Open Screenshot | Press Shift-Command 5. |
| Capture the Touch Bar | Press Shift-Command-6 |
Now, if you ever take a screenshot using Shift-Command-4, Mac also takes them on Clipboard. No need to find where do screenshots go on Mac, you can directly paste them to share.
Best Tool to Freely Take and Save Mac Screenshots
That’s it! That answers your question, “Where do Mac screenshots go?” But if you take a lot of screenshots, it will leave your desktop messy! So, if you are considering another option to take screenshots aside from using Mac’s default way, you can use the 4Easysoft Screen Recorder tool! This tool lets you easily and quickly take screenshots of your Mac’s screen and save them anywhere! This tool lets you choose which file folder to store and save the screenshots immediately. With that, you can make your screenshots organized and manageable without find where do go screenshots on Mac.
- You can take a whole screen or window screenshot using the tool’s hotkeys.
- Support option to screenshot lengthy documents, webpages, programs, etc.
- Enable you to add text, shapes, and lines to your screenshot as notes.
- Able to export Mac screenshots in almost all image formats than PNG.
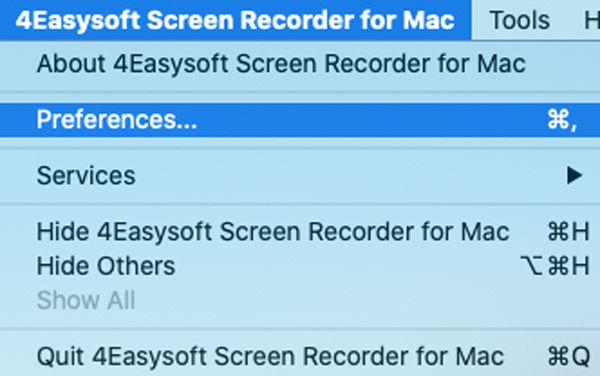
Step 1. Download and launch 4Easysoft Screen Recorder tool on your Mac computer. Click the tool’s “Menu”, and select the “Preferences” option. Here, you can modify the screenshot output-related and hotkeys settings.
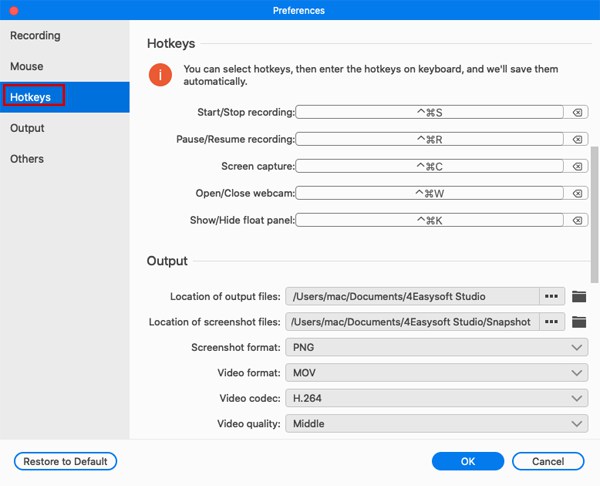
Step 2. Next, click the “Output” tab, head to the “Location of screenshot files” option, and set the location where you want to store your screenshots. Moreover, you can set the hotkeys and output format as you like. Now, you can start taking screenshots on Mac.
Step 3. Once you save the above setups, go back to the tool’s main interface, access the window you want to screenshot, and click the “Screen Capture” button. After saving the screenshots, you can go to the desired folder you set to find them.

How to Change the Default Location of Mac Screenshots
There you go! That’s the explanation and location where do screenshots go on Mac. Now, if you are asking, “Can I change the default location of Mac screenshots?” Fortunately, Mac allows you to change the default location of your screenshots, and you can do it in two different ways for different versions of Mac.
1. If you are using macOS Mojave, Catalina Big Sur, Monterey, or macOS Ventura, here are the simple steps on how you change the default location where do screenshots save on Mac:
Step 1. Head to your Mac, access the window you wish to take a screenshot in and press the “Command, Shift, and 5” keys on your Mac's keyboard. Then, click the “Options” dropdown button from the “Screenshot Display Tools” on your screen and choose a directory option.
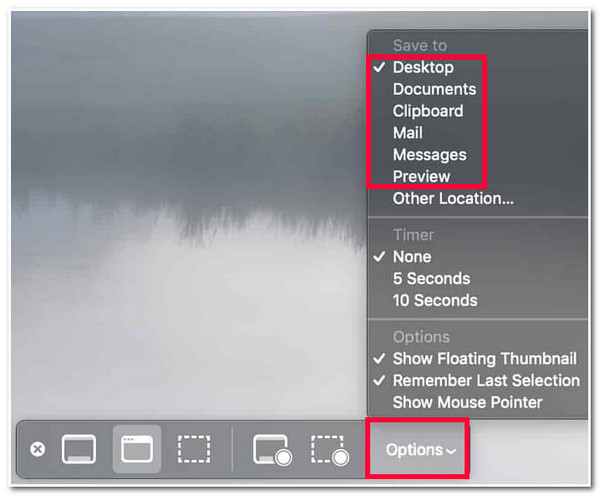
Step 2. Otherwise, you can also click the “Other Location…” button if your preferred file folder directory is unavailable on the selection. Then, after that, the screenshot will automatically be saved on the file folder location that you have selected.
2. In case you are using a Mac that runs macOS High Sierra and older versions, here are the steps you should follow:
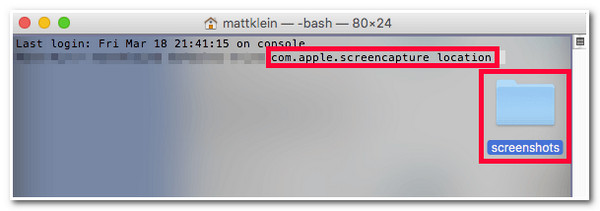
Step 1. Launch your Mac’s “Terminal” program. After that, type in the “defaults write com.apple.screencapture location” text. Ensure that you have typed in the right text in the command line.
Step 2. After that, type in the file folder directory where you want to save the screenshots. You can also drag the folder instead to the terminal window. Then, press the “Return” key and type in the “killall SystemUIServer” text to finally change the location.
Can You Save Mac Screenshots on iCloud to Avoid Losing
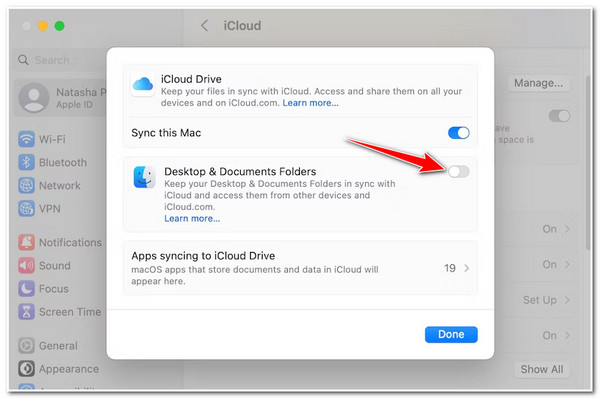
If you are tired of finding where do screenshots save on Mac, you can also save Mac screenshots on iCloud to avoid losing! This is a perfect option to ensure you won’t lose your Mac screenshot. Aside from that, you can easily access them on other devices as well. So, to save your Mac screenshots on iCloud, here are the steps you should follow:
Step 1. Head to your Mac’s “Apple Menu” and select the “System Settings” option. After that, click the “Apple ID” button, select the “iCloud” option, and choose the “iCloud Drive”.
Step 2. Next, click the “Desktop & Documents Folders” toggle switch to turn it on to save the screenshots stored in these folders to iCloud. By enabling this, all files stored in these folders will automatically be saved on iCloud.
Bottom Line
Now those are the explanations of where do screenshots go on Mac! After reading this post, you can quickly access and find the screenshot you’ve taken on your Mac. If you want to change the default storage location and save the screenshots on iCloud, follow the steps above. Suppose you are looking for an alternative way of taking screenshots on a Mac that offers a well-organized and easy-to-access screenshot-storing process. Thus, the 4Easysoft Screen Recorder is what you are searching for!
